
You're Doing Interfaces Wrong
Interfaces are everywhere, but still we have tight coupling, and inflexibility. Dependency inversion is the answer.
Create a kaleidoscope effect with HTML5 canvas, a few images and JavaScript.
Canvas let's us play with graphics. I had a lot of fun with Kaleidoscope's as a kid, so let's make one!
Mirrors are the secret to the amazing effects viewed though a kaleidoscope. An image is displayed at the end of a long tube which is lined with mirrors, usually three, which reflect each other's image to produce an effect. Movement of the image at the end of the kaleidoscope produces the familiar effect. The configuration and number of the mirrors changes the reflection pattern. But, even three mirrors can produce many variations based on the angles of the resultant triangle. Here are some variations:
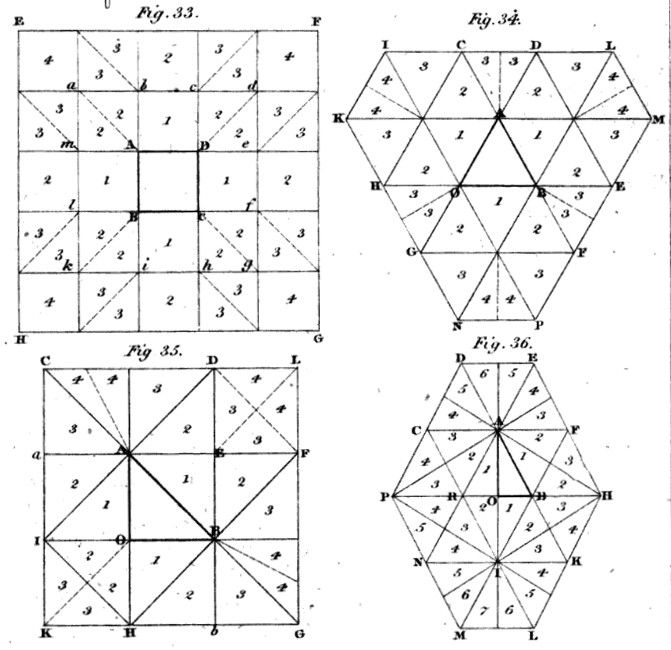
A few years ago, I created a process to construct a simplified version of the equilateral triangle set up (fig. 34 above). I was pretty happy with the results, though it is resource heavy.
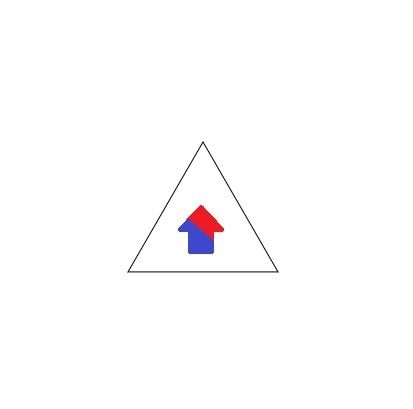
The first step is simple - choose a base image to work with. To help illustrate what's going on, I'm going to chose a simple image that won't bamboozle - we'll substitute with a more bamboozling image later. This is the image that goes at the end of the mirror tunnel, and forms the first, base triangle.

In a kaleidoscope, all segments can be drawn by either rotating the base image, or by flipping the base image and possibly then rotating. Ergo, we also need a flipped version of the sample image:

Now, to create a canvas and place that first triangle. Here's the HTML I'm going to be using. This won't change until near the end of the exercise:
<!DOCTYPE html>
<html>
    <head>
        <script src="kaleidoscope.js"></script>
    </head>
    <body>
        <img src="sample.js" id="base" style="display:none">
		<img src="sample-flipped.js" id="baseR" style="display:none">
        <canvas width="800" height="400" id="c"></canvas>
        <div id="target" style="width: 1024; height: 1024;"></div>
    </body>
</html>
Now, to write the triangle in the JavaScript file. We could write the image to the canvas by copying pixel by pixel, but defining a pattern offers a faster alternative.
window.addEventListener("load", function(){
    var c = document.getElementById("c");
    var baseImg = document.getElementById("base");
    var baseRImg = document.getElementById("baseR");
    var ctx = c.getContext("2d");
    var pat = ctx.createPattern(baseImg, "repeat");
    var patR = ctx.createPattern(baseRImg, "repeat");
    var patDim = 150;	//pattern is 150x150 square.
    var SqrtOf3_4 = Math.sqrt(3)/2;
    //height of triangle side given side length of 150 is:
    var height =  SqrtOf3_4 * patDim;
    var offset = 150;
    ctx.translate(offset,offset);
    ctx.fillStyle=pat;
    ctx.beginPath();
    ctx.moveTo(patDim, height);
    ctx.lineTo(patDim/2, 0);
    ctx.lineTo(0, height);
    ctx.closePath();
    ctx.fill();
    ctx.stroke();	//stroke included here helps with illustrating the draw
});
Here is the result:
In the figure pattern we are basing the design from, it shows there are second-order reflections of the central triangle. For our purposes, a second-order reflection is the same as the original triangle, only rotated. However, in reality, these reflections also have their pattern centers shifted slightly. Nonetheless, in our interpretation, the triangles will be identical, so I'm going to abstract away much of the triangle drawing into it's own function so it can be called multiple times:
var drawTriangle = function(leftPos, topPos){
    ctx.fillStyle=pat;
    ctx.beginPath();
    ctx.moveTo((leftPos+1)*patDim, (topPos+1)*height);
    ctx.lineTo((leftPos+0.5)*patDim, (topPos)*height);
    ctx.lineTo(leftPos*patDim, (topPos+1)*height);
    ctx.closePath();
    ctx.fill();
    ctx.stroke();
};
drawTriangle(0,0);
});
The above code will produce an identical image.
Calling "drawTriangle" multiple times with different arguments will draw the other triangles we require. In my system, the central triangle is at position 0 0, and positions to the left and above differ by a triangle width or height respectively.
Here's the concept in action:
drawTriangle(0,0);
drawTriangle(1,0);
drawTriangle(1,1);
drawTriangle(-1,-1);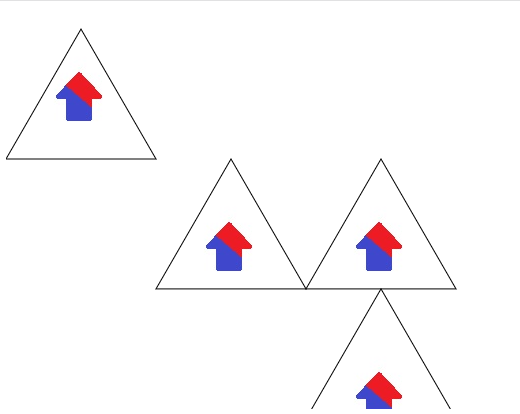
This is not quite what I wanted - the rows above and below the existing need to be offset by half a row. I could pass this in myself, by specifying half-units, but this wouldn't shift the PATTERN center. And you can see, in the top left triangle, an unintended consequence of this already - the triangle does not take up full pattern height, so the pattern has shifted upwards. The way to address this will be to offset the canvas with each triangle, AND to offset horizontally by a half-step on alternate rows.
Here's the updated code and result:
    var drawTriangle = function(leftPos, topPos){
	var leftOffset = leftPos*patDim;
        var topOffset = topPos*height;
        if(topPos%2 !== 0){	//use !==0 instead of === 1 because -1 is also possible.
            leftOffset += patDim/2;
        }
	ctx.translate(leftOffset,topOffset);
        ctx.fillStyle=pat;
	ctx.beginPath();
	ctx.moveTo(patDim,height);
	ctx.lineTo(0.5*patDim, 0);
	ctx.lineTo(0, height);
	ctx.closePath();
	ctx.fill();
	ctx.stroke();
	ctx.translate(-leftOffset,-topOffset);
    };
    drawTriangle(0,0);
    drawTriangle(1,0);
    drawTriangle(1,1);
    drawTriangle(-1,-1);
Now, this is still actually wrong, because we need to also rotate these reflections, but we'll leave them for the time being and it will become more clear what we have to do.
Let's look at the first order reflections now. This requires the reflected image pattern to be used, and an upside-down triangle. My first attempt is below, with comments explaining the differences to the other code:
var drawTriangleR = function(leftPos, topPos){
var leftOffset = leftPos*patDim;
    var topOffset = topPos*height;

    //in this instance, we want to offset by half on the EVEN rows, to fill up the small spaces
    if(topPos%2 === 0){
        leftOffset -= patDim/2;	//offset left instead of right
    }
ctx.translate(leftOffset,topOffset);
    ctx.fillStyle=patR;		//use patR instead of pat.
ctx.beginPath();

//different coordinates for the upside-down shape.
ctx.moveTo(patDim*0.5,height);
ctx.lineTo(patDim, 0);
ctx.lineTo(0, 0);
ctx.closePath();
ctx.fill();
ctx.stroke();
ctx.translate(-leftOffset,-topOffset);
};
//drawing reverse triangles
drawTriangleR(0,0);
drawTriangleR(1,0);
drawTriangleR(1,1);
drawTriangleR(-1,-1);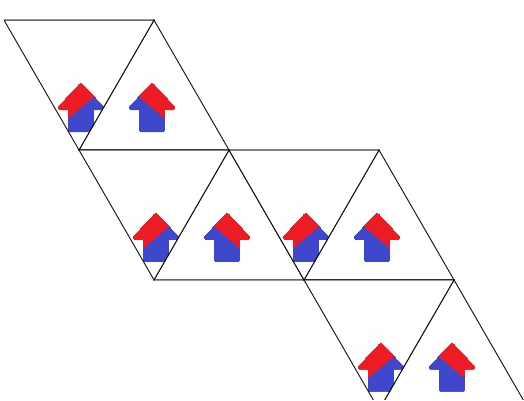
This attempt reveals some problems. Yes, we reflected the image, but the plane of reflection is always horizontal - not along a triangle's edge like a real mirror. To simulate that reflection, it is necessary to rotate the pattern as well as translate it. However, rotating the canvas will also alter the coordinate calculations.
So, to make things a little more straightforward, we're going to make triangles in straight lines, one by one, rotating the entire canvas at each triangle by 120° anti-clockwise using normal triangles, and then doing the same with the flipped pattern.
//height of triangle side given side length of 150 is:
var height =  SqrtOf3_4 * patDim;
var offset = 100;
var i = 0;


	//draw kaleidoscope first row.
	ctx.save();
	ctx.fillStyle=pat;
	ctx.translate(0, offset);
	while(patDim*(i-1) <= c.width){
		ctx.beginPath();
				ctx.moveTo(0,-offset);
				ctx.lineTo(patDim, -offset);
				ctx.lineTo(0.5*patDim, height-offset);
			ctx.closePath();
			ctx.fill();
			ctx.stroke();
		if(i%3==0){
			ctx.translate(patDim,-offset);
			ctx.rotate(-120*Math.PI/180);
			ctx.translate(-patDim,offset);
		}
		else if(i%3==1){
			ctx.translate(0.5*patDim, height-offset);
			ctx.rotate(-120*Math.PI/180);
			ctx.translate(-0.5*patDim, -height+offset);
		}
		else if(i%3==2){
			ctx.translate(0,-offset);
			ctx.rotate(-120*Math.PI/180);
			ctx.translate(0,offset);
		}
		i++;
	}
	ctx.restore();
	ctx.save();
	ctx.scale(-1,-1);
	ctx.fillStyle=patR;
	ctx.translate((-i+(i%3==0?0.5:i%3==1?-1.5:-0.5))*patDim, -height+offset);
	var j=0;
	while(j < i+2){
		ctx.beginPath();
				ctx.moveTo(0,-offset);
				ctx.lineTo(patDim, -offset);
				ctx.lineTo(0.5*patDim, height-offset);
			ctx.closePath();
			ctx.fill();
            ctx.stroke();
		if(j%3==0){
			ctx.translate(patDim,-offset);
			ctx.rotate(-120*Math.PI/180);
			ctx.translate(-patDim,offset);
		}
		else if(j%3==1){
			ctx.translate(0.5*patDim, height-offset);
			ctx.rotate(-120*Math.PI/180);
			ctx.translate(-0.5*patDim, -height+offset);
		}
		else if(j%3==2){
			ctx.translate(0,-offset);
			ctx.rotate(-120*Math.PI/180);
			ctx.translate(0,offset);
		}
		j++;
	}
	ctx.restore();
This produces the following:
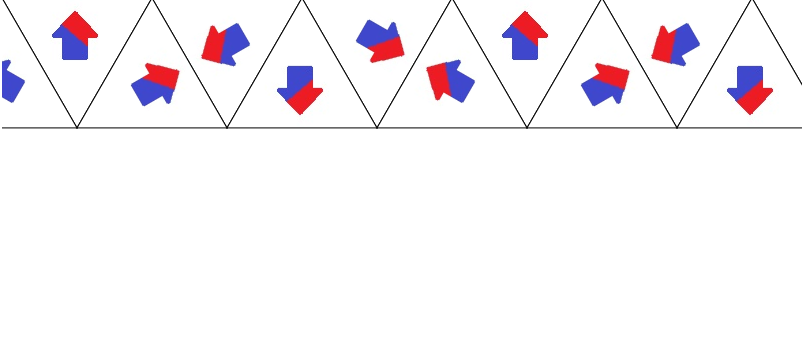
In the above code, I also made one more significant change to the old version, I am drawing the triangle on a vertical offset and translating the canvas backwards by the same vertical offset at each point. This allows me to alter which part of the PATTERN is drawn within the triangle, simply by changing the offset value, while the triangle position remains the same.
By wrapping the entire logic in a function with a "window.setInterval" and incrementing the offset at each function call, this allows the pattern to appear to move. Technically, we are moving the triangles and the canvas backwards and forwards to produce the effect, but who cares!
Each triangle here is a perfect reflection of the it's adjacent triangles. In a real kaleidoscope, each reflection is a slightly shifted version of the reflection, picking up neighboring reflections and dimming slightly. However, this effect is largely similar, and does have a very important advantage of being simple and tile-able.
To create a tiling pattern, we need three widths of triangle and two rows. Adjusting the above code slightly, we can produce just what we need. I used a trial and error method mostly to get this right. It is a bit confusing because the rotation of the canvas changes the coordinate system constantly. However the logic is mostly similar.
Just before the while loop, I rotate the context because the first-triangle I need to draw is different:
	ctx.translate(0, -offset);
	ctx.rotate(120*Math.PI/180);
	ctx.translate(0, offset);
I also changed the condition of the first while loop to be simply while(i<=3) to draw three triangles and the second to while(j<i) to draw two less triangles than before.
I also had to cycle the if conditions around for the other rotations due to that additional initial rotation. The result is below:
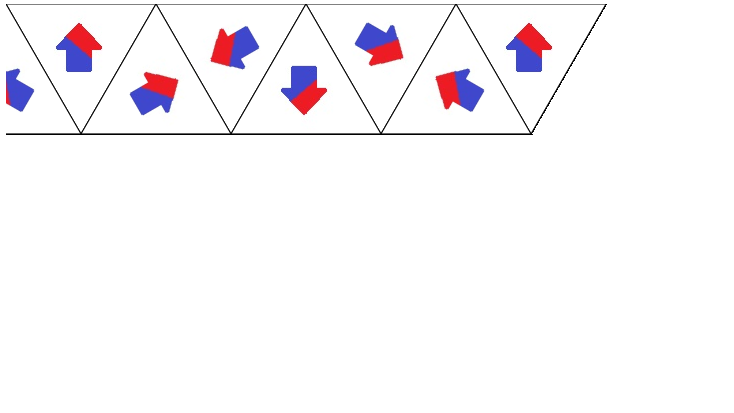
Now, to draw the second row, I merely have to repeat the row with an offset:
I do this by translating the canvas back and forth which each step, modifying the setInterval function to call function twice and with a translation back and forth:
window.setInterval(
	function(){
		fn();
		ctx.translate(1.5*patDim, height);
		fn();
		ctx.translate(-1.5*patDim, -height);
	} , 1000/24);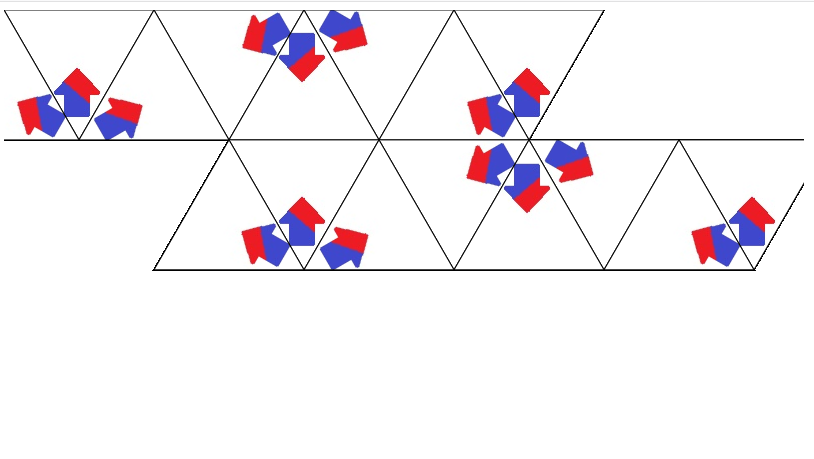
And I'll modify the fn function to accept a parameter to translate the canvas at different points when doing the alternate row. It's not the best solution, but it does work.
The result:

Now the easy part!
I'm going to modify the canvas to be exactly the size and position of the intended tiling pattern, and grab that canvas image as a base64 image. The Canvas size required is 3*trianglewidth by 2*sqrt(3/4)*trianglewidth. For my triangle of 150px that's 450px by 259 px. Shifting the pattern by half a triangle width is easily done on page load with a single instruction. Here is the result:

From here it's trivial to update the background-image property of an object (in my case the target div) to tile the canvas pattern, using a base64 image via the toDataURL element on the canvas. Removing the .stroke() method also removes the black lines, which were mostly for illustrative purposes:
While this approach may work on some browsers, it certainly looks terrible on mine. Whenever the background image is replaced, there's a good chance there will be a flicker as it loads.
To address this, I altered the final approach to draw the tiling pattern into the canvas instead (while making the canvas bigger), and this did produce a smoother animation. You can check out the codepen at the end of this article for exactly how that works.
To make the Kaleidoscope appear more typical of a kaleidoscope, I generated an image randomly with Gimp, ran it through a Mosaic filter, made it tileable, and then played around with the colours. For a more convincing effect, I found the image should have light and dark areas within it, as well as a contrast of small and large shapes. Here is the image I used:

And here is the final result:
I've put the code in codepen if you're interested in checking out the final code:
See the Pen Concept Kaleidoscope by Binderbound (@binderbound) on CodePen.
In a previous implementation I made the scroll speed slow down gradually to a stop, to give a more lazy appearance. I also made it speed up again when the user scrolls the page, and even go in the reverse direction if they scroll the opposite way.
There is also definite room for improvement to avoid the need to keep rotating and translating the canvas as much as we do. Two rotations should be sufficient to draw all triangles we need.
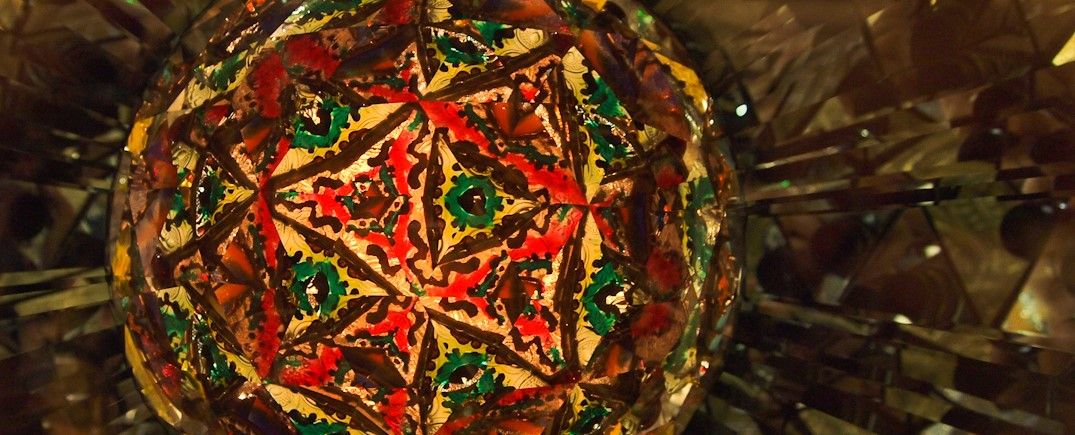
As already discussed, and as evidenced by the cover image of this article, the true kaleidoscope will have it's reflections shift further and further as you deviate away from the original triangle. Some of the reflections are even split half-triangles. A more faithful approach would not be tileable, but certainly could be interesting.
The animation of the kaleidoscope could also be adjusted for a more interesting effect. Rather than moving only vertically, using a square image and independent vertical and horizontal offsets could produce more variation. Some kaleidoscopes, such as column-based kaleidoscopes, do have their central triangle's movement in a single direction, but others, like wheel kaleidoscopes, rotate their object of focus as well.
This method uses a single base image as the background for the kaleidoscope. However, many kaleidoscopes use a floating layer to provide more variations. This could be done by using an image of artifacts with a mostly transparent background as a second pattern drawn over the top of the first, but with a variation offset independent of the base image.
Finally, kaleidoscopes vary intensity of light in addition to shape. More canvas manipulations of the pattern image could be applied to increase lightness or contrast to produce a more dynamic effect. If using a second image layer, canvas blend modes could be used to make a second floating layer's brightness based on what is behind it.